Menu
3 Minute Video Walk Through – (Applies to both Steel Loop and Cable Lock models)
Open the rubber tab covering the USB-C port and fully insert in the charging cable so it is flush with the device. Proper charging will turn on your device and the red “PWR” light will flash. If there is a gap, or the light does not turn on, it is not properly plugged in. Make sure it is plugged in all the way. Allow up to 5 hours to fully charge approximately every 2 weeks. The power button is located on the top of the GunAlert.
When prompted, you must click “Allow” to grant permission for GunAlert to send notifications.
Enter your “Device IMEI Number” found on the side of GunAlert, or on the plastic card in the box. For easy entry you may click the “scan” icon in the right side of the text field in the app, then allow access to your camera. Cover neighboring barcodes if they are interfering with scanning.
Create & confirm a password. Accept the terms and conditions and click “Sign Up“
This will automatically send a verification e-mail to you.
Grant permission to use your location by selecting “Allow While Using App”.

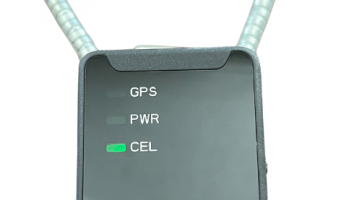
The “CEL” light flashes while searching for a cellular network. When connected it pulses slowly.
1st connection, or connection after long periods of non-use, can take up to 1 hour. Move GunAlert to a window or outdoors to promote connectivity.
Like a car alarm, enable Security Mode when you are leaving your firearm unattended.
Lock GunAlert in place. In the app “Security” tab, toggle “Security: Enabled”. If security does not enable, check that the CEL light is pulsing slowly (once every few seconds) indicating cellular connection.
To test Security Mode move the GunAlert.
Motion with Security Mode Enabled will send location updates every 5 minutes via push or by email.
Toggle Security Mode: Disable.
Like a virtual car alarm, GunAlert will continue to alert you that it has been moved and send location updates until you Disable Security Mode.
If you do not want to receive both Push and Email notifications, you can edit those settings, see step 13.
Click the “Device Location Update” or “Locate Me” to view GunAlert on a map. The black “pin” at the center of the map is GunAlert. The blue dot is YOU (your phone’s current location). Both are shown so you can see your position in relation to the GunAlert. Zoom in on the black pin to see it’s precise location.
Click the pencil top right to edit your device name or settings. FYI: device settings can not be edited with Security mode enabled.
Optional: Adjust the sensitivity of the motion detection using the Accelerometer (Motion Sensor) slider.
Optional: Adjust the size of the geofence. (A radius around the current location that will alert you if the device exits this area.)
Toggle Push notifications (alerts that display directly on your phone) or Email notifications to suit your communication preference. Turn off “Email” if you do not want an email for every alert associated with this device.
If you have “Items” set up (ie. range bag) you can add this device to that item.
Click “Save” when done.

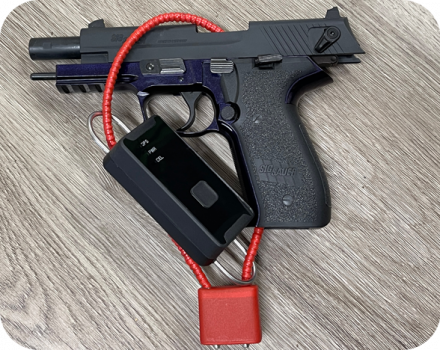
Lock GunAlert on to your firearm, range bag or case, set Security Mode and rest easier.

Your new GunAlert device comes with 1 month of service included. If you purchased on Metalert.shop your subscription is all set! Or to subscribe to service for a device purchased on Amazon, Range USA or another 3rd party- subscribe here. This may not apply if you have a corporate account who is paying for the service plan. Like a cell phone, a network subscription is required for GunAlert to function. After 30 days you will be emailed deactivation notices from MetAlert. (white list info@metalert.com) If you do not subscribe after the 1st month, your GunAlert device will be deactivated.
*Remember to use the same name / email address for your subscription sign up as used for your App account registration. If you did not use the same email address, please contact us at info@metalert.com and we will inform the Billing Department so your device is not deactivated in error.
The first time you log in, and periodically you may be sent an email with a verification code to enter in to the app. This 2 factor authentication is for your protection and ensures it is really you, and only you, accessing your app’s content.
All the information about you, your guns and any location is encrypted. The encryption key is ONLY stored on your phone, so only you can view any of this information. Moreover, location information is automatically cleared off your phone after 30 days. You can go to the Settings tab to delete location data from your phone at any time. No data is stored on a server. Deleted data is irrecoverable under any circumstances.
Moreover, the cellular network platform is U.S. based and U.S. serving and is GSMA & Telco Certified. No overseas servers or networks.
Location information is stored on your phone for 30 days. You can view location updates no more than 30 days in the past. You can go to the Settings tab to delete location data from your phone at any time. Once the data has been deleted it is irrecoverable.
GPS and cellular connection can be affected by building structures. As you may have noticed, all cell phones & GPS trackers connect better outdoors than in a basement, for example. Move the device to a window to achieve connection, then place it in your desired location. Line of sight with the sky is best.
You can add “Items” to your GunAlert app. This is optional, but it is designed to make it convenient for you to store information about your guns for easy access. As an example, you can add an ‘item’ named “Range Bag” to indicate where you have your GunAlert attached. If your range bag is stolen, you know which guns, magazines and accessories are in it.
Currently, the large square button on your GunAlert device does not have any functionality. The button is reserved for future upgrades.
Easiest Device + Service Plan Ordering with Free Shipping
30 Days Free Service and Lowest Subscription Plan Choices
Like a cell phone, GunAlert® requires an active subscription to a Monitoring Service Plan in order to function. Devices purchased from a 3rd Party will also require you to subscribe to service on Metalert.shop. Plans under $5 / month.
GunAlert® and Level 2 Security® are wholly owned by MetAlert Inc.
Copyright 2025 MetAlert Inc. All Rights Reserved
Website by Vectra Digital